(Warning- there was some lost intranslation moments with the copying and pasting! Especially given my lack of abilities with certain technologies)

What you had for breakfast, lunch & dinner
How to do a hobby you enjoy
Some of your art or poetry
Your philosophy on life

Many thanks to the Snail Mailer for asking me to do a guest post for her “Make-It Monday” series! Lately I’ve been really into mini-zine making, and she wanted me to share how I make them. So here goes nothing!
First, a bit about zines… A Zine (short for “fanzine” or “magazine”) is a self-published work, traditionally to share ideas, art, or propaganda of sorts. Some famous zine ancestors include “Common Sense” by Thomas Paine, the American Revolutionary, and H.P. Lovecraft, an American sci-fi/horror author, was a huge proponent of the “amateur press” movement. Zines became wildly popular in the 1960s during the dawn of the punk rock era, especially with cheap copy machines making it so much easier to mass produce them. The role of zines in history is a fascinating one, and you can even pick up a zine to learn more about them!
Now, I’m going to show you how I make a mini-zine (usually a Letter-sized paper folded into a zine) but I don’t want my tutorial to limit your imagination on zine possibilities! Zines come in all sizes, colors and styles and can be about anything at all! They can be all text or all art (though it’s always good to put some contact info in your zine so your fans can get more of your art & ideas!). Anything goes!! If you Google zines you’ll get lots of ideas. Some topics for your zine could be:
What you had for breakfast, lunch & dinner
Some of your art or poetry
Your philosophy on life
Your favorite rock star (this is my chosen topic for the zine I’ll be showing you!!)


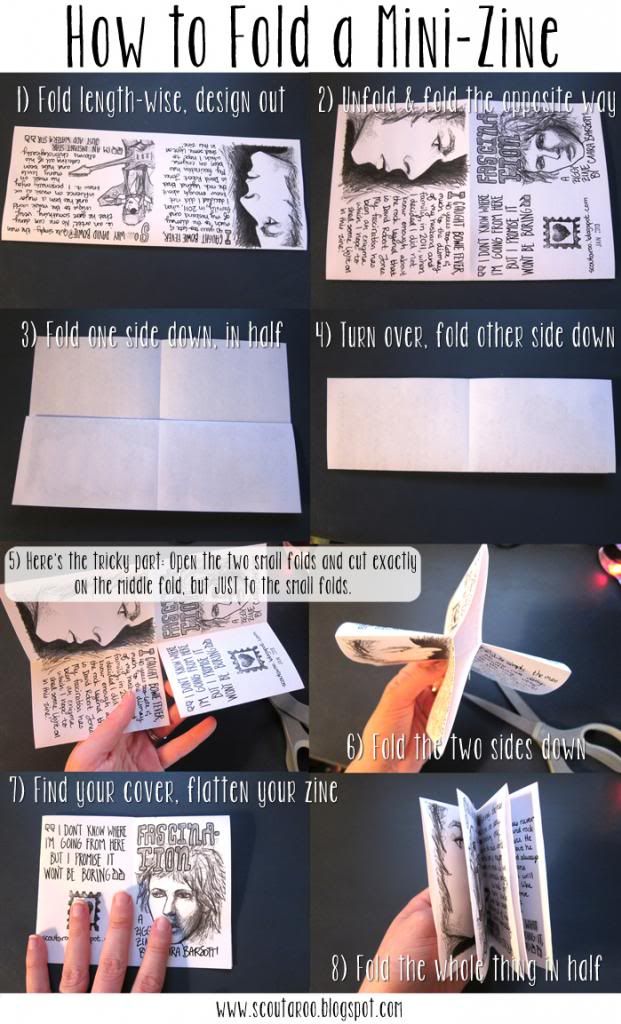
1 Fold in half length-wise, design facing out
2 Unfold and fold in half the opposite way, design out
3 Fold one side down in half
4 Turn the whole thing over and fold the other side down in half
5 Here’s the “tricky” part: Unfold the two smaller half-folds and cut on the middle fold, just to where the two smaller folds are.
6 Fold the two halves down so the cut portion is on top (see your pages??)
7 Find your cover and flatten your zine
8. Fold the whole thing in half

Yay! You made a zine! See how much fun that was?! Ok, now what? How do you share your zine with the world?
Some cities have a section in their local bookstores or libraries just for zines. Some people sell their zines on etsy or leave them random places for strangers to find. Others mail their zines to their penpals or hand them out to their friends and family. I made a zine instead of an annual Christmas card for my family this year! Like I said, the possibilities are endless!
S Some places to swap zines online & some good zine resources:
So, are you ready to make your zine??
Materials I used in “Fascination: A Ziggy Zine”:
~Bristol paper (I use this because I like to use watercolor and inks on my zines and regular copy paper doesn’t always hold up!)
~Pencils (mechanical & graphite)
~Dip Pen & India Ink
~Copic Markers
~A ruler
~A ruler
One of the most important bits about constructing the physical zine is making sure your margins & spacing is good! I like to leave a ¼ inch margin around the entire outside edge, because almost any copier you use will make nice copies that won’t cut off any of your hard work with that margin size. I also mark where my 8 pages will be and try to leave some margin between pages so that the folds are nice and clean! The photo shows where each of your pages will be when it’s all folded down, too.

Once everything is laid out, you get to start filling your zine with awesomeness!! Sometimes I separate the pages, but in this zine I used full page “spreads” (1&2, 3&4, and 5&6 will be facing pages. Keep that in mind when designing your zine). I start with pencil and then go over my text and drawings in ink, and finish with copic markers or watercolor depending on if I want to print color or black and white copies. In “Fascination” I decided to leave my pencil drawings un-inked and use copic markers to add some contrast. I like to hand-draw/ink/paint everything in my zines, but I’ve also used lots of stickers and magazine clippings in my zines. I’ve even used little crocheted flowers & hearts on my zines! If it’s flat enough to copy without making weird lumps & shadows, use it!


Another important thing to keep in mind with zine making is CONTRAST! Depending on your copier, some of your lighter lines may disappear, and some of your darker lines may lose detail as well. Get to know your printer! Fed Ex/Kinkos is kind of pricey, but they make nice, accurate copies for zines that use more detailed drawings.
Now that you’ve filled your mini-zine with all kinds of cool ideas & art, make a bunch of copies! Then comes the daunting part of zine-making… but it’s really easy once you’ve figured it out, and it only looks complicated, I promise.

In case the text on the image is hard to read, here is the full-sized image, and here are the written instructions on how to fold your zine:
1 Fold in half length-wise, design facing out
3 Fold one side down in half
4 Turn the whole thing over and fold the other side down in half
5 Here’s the “tricky” part: Unfold the two smaller half-folds and cut on the middle fold, just to where the two smaller folds are.
6 Fold the two halves down so the cut portion is on top (see your pages??)
7 Find your cover and flatten your zine
8. Fold the whole thing in half

Yay! You made a zine! See how much fun that was?! Ok, now what? How do you share your zine with the world?
Some cities have a section in their local bookstores or libraries just for zines. Some people sell their zines on etsy or leave them random places for strangers to find. Others mail their zines to their penpals or hand them out to their friends and family. I made a zine instead of an annual Christmas card for my family this year! Like I said, the possibilities are endless!
S Some places to swap zines online & some good zine resources:
-
*Thank you Ciara for the awesome posts! Join here at her newest endeavor, the Scoutaroo Paper company! -b*
Thank you VERY much for this post! I have been seeing the word Zine bantied about online; a brief description or definition; and even how to fold one. But your post puts all the pieces together with enough added information that a novice like me can get a much clearer picture of what a ZINE is really all about. Now I am armed and ready to try one myself.
ReplyDeleteLooks lovely! I might try that once I have more time at hand...
ReplyDeleteBut I guess you once got confused with left and right, didn't you? Or maybe it's just my personal way, but I'd much rather ink from left to right than from right to left...
A penpal once sent me a zine and I loved it!
I figured out how to fold the paper correctly and was overjoyed! Now to find something to put in it. : ) Thanks for the DIY FYI, Ciara!
ReplyDeleteI was totally baffled as to how one would fold a zine and cut it, etc..very clear instructions, thank you for your fun post and the helpful pics!
ReplyDeleteWonderful instructions! Now if I could only draw . . . .
ReplyDeleteooh, i like the idea of sending a zine for Christmas cards... now if I can just remember this idea next December!
ReplyDelete